Showing posts with label Elan. Show all posts
Showing posts with label Elan. Show all posts
Monday, December 13, 2010
I am back to projects:)
I am done with my garage work for now, so I can start working on the projects again. Last week I started making the shop press. It's going to be double column 12 ton press with hydraulic jack. Frame is welded together, now I need to make a base for it and the ram. After that's done I can deal with suspension parts and engines for the sleds:) Pictures are coming.
Read more...
Read more...

Thursday, November 4, 2010
Elan's frame is primed

I am working on insulating my garage right now, so didn't have much time for the projects. Managed to finish all welding and grinding on the frame and primed it with Tremclad Rust Primer.
Here are some pictures of the frame:


Read more...
Monday, October 25, 2010
Elan steering parts
I was planning to paint the frame last weekend, but didn't have any time:( Also, I need to figure out seat mounting - bolting it on frame isn't the best way... I want somethinf different. Need to think:)

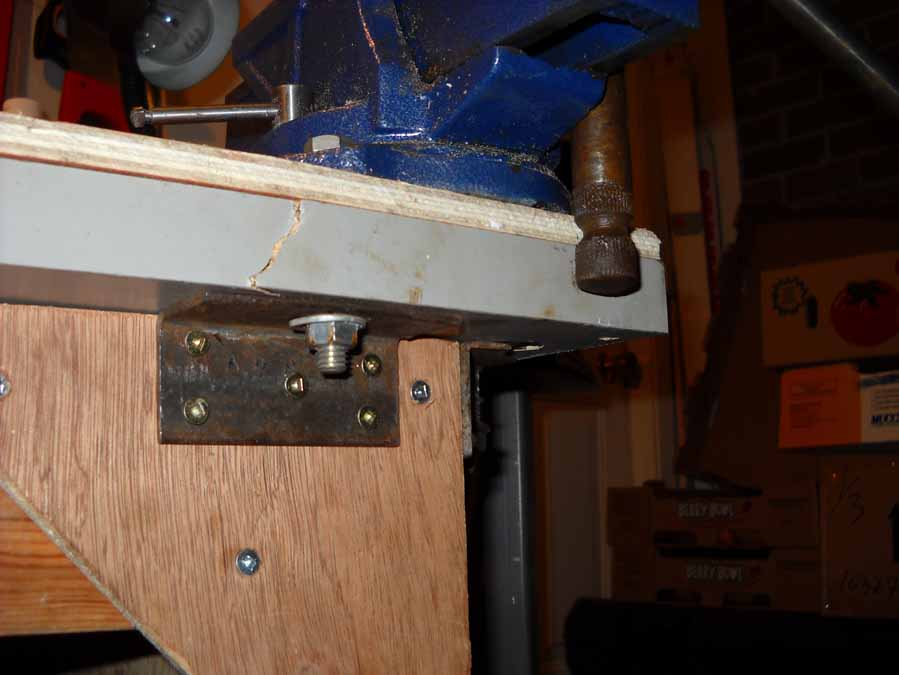
Decided to spend some time on steering parts: I left skis assembled, but the skis themselves are scrap metal, so I needed to separate useful parts. I have to admit, they fighted me hard. My victory cost me a few dulled drill bits, broken table (broke the corner with the vice), and sore hands...
Here is the result of using wrench extension:
Reinforced vice:)

Rust is number one enemy of any sled restorer. Surface rust isn't that bad, but then it works like a retainer of axles, bolts, etc. - it's terrible!!! It took me a good couple hours to dissassemble those ski legs... Bolts had to be drilled out. Now they are ready to go in rust removal bath...

Result of drilling...

Read more...

Decided to spend some time on steering parts: I left skis assembled, but the skis themselves are scrap metal, so I needed to separate useful parts. I have to admit, they fighted me hard. My victory cost me a few dulled drill bits, broken table (broke the corner with the vice), and sore hands...
Here is the result of using wrench extension:
Reinforced vice:)
Rust is number one enemy of any sled restorer. Surface rust isn't that bad, but then it works like a retainer of axles, bolts, etc. - it's terrible!!! It took me a good couple hours to dissassemble those ski legs... Bolts had to be drilled out. Now they are ready to go in rust removal bath...

Result of drilling...

Read more...
Saturday, October 16, 2010
Blog news: manuals section added
I added new section to the blog: manuals. Here you can find Ski-Doo shop and parts manuals. I will try to figure out how to make them downloadable...
Read more...
Read more...
Friday, October 15, 2010
Second Elan is dissassembled

Spent some time clearing the room on the floor in the garage. Assembled Elan takes much more space then parts bins:) I can continue work on the frame now.

I was doing ongoing inspection during the disassembly: most of the parts are in better shape then those I had. When I was picking the sled up I felt that it wasn't smoothly rolling on the track and I found the cause: the left axle bearing was destroyed and inner race of the bearing wore the axle beyond repair. Gear case isn't damaged.

Frame got some damage in the tank area and some rust on the tunnel - not too bad.


Bogies' tires are worn and 2 bogies shafts are in bad shape. One is reusable.
Track is original, but cracked badly. Everything else is in useable shape. Just some cleaning and repainting.


Read more...
Sunday, October 3, 2010
Leak down tester for two-strokes
Today is "small things" day! Those little tasks always can wait until you get the bunch to do them at once. Wheels’ dust cups got their grease fittings today; vegetable cutter got the blades fixed; I assembled a leak down or pressure/vacuum tester for two stroke engines.

For those who are interested here is a bit more information on the tester >>>>
What is pressure testing? The pressure testing of a 2-stroke engine is a test performed to verify air leakage (actually, you don’t want air leakage). An air leaks will cause lean conditions in air/fuel mix with a possible result in engine damage (seizure, detonation, hole in the piston, etc.)
For more information how to perform the test and how to build the tester you can check these links:
www.duncanracing.
www.macdizzy.comh
www.greenhulk.net
www.allthingsmoto.com
Last week I received the pressure/vacuum gauge in the mail and today I put the tester together. At first I wanted to use the valve from tire tubes, so I can use bicycle hand pump, but I couldn’t find it in my bits bin… I decided to use the leak down tester set up I have for 4-stroke engines. It has regulator, so I can increase the pressure safely. I don’t have a vacuum pump, so I will do only pressure testing for now…
The gauge I use is common engine vacuum/pressure tester available from some auto parts stores.

I got mine from ebay for 16 dollars shipped. It comes with a hose, so all you need are fittings, brass T, some kind of check valve or just a shut off valve like I used and source of pressure/vacuum. Actually, you can use whatever you have: the gauge is suppose to be able show you low pressure precisely enough.


I am going to test my Yamaha Excel engine, so I use taper rubber plug with maximum OD 1.8” – it fits right in rubber intake manifold. I am going to seal the exhaust with rubber sheet.
I am curious to see the result…
Read more...

For those who are interested here is a bit more information on the tester >>>>
What is pressure testing? The pressure testing of a 2-stroke engine is a test performed to verify air leakage (actually, you don’t want air leakage). An air leaks will cause lean conditions in air/fuel mix with a possible result in engine damage (seizure, detonation, hole in the piston, etc.)
For more information how to perform the test and how to build the tester you can check these links:
www.duncanracing.
www.macdizzy.comh
www.greenhulk.net
www.allthingsmoto.com
Last week I received the pressure/vacuum gauge in the mail and today I put the tester together. At first I wanted to use the valve from tire tubes, so I can use bicycle hand pump, but I couldn’t find it in my bits bin… I decided to use the leak down tester set up I have for 4-stroke engines. It has regulator, so I can increase the pressure safely. I don’t have a vacuum pump, so I will do only pressure testing for now…
The gauge I use is common engine vacuum/pressure tester available from some auto parts stores.

I got mine from ebay for 16 dollars shipped. It comes with a hose, so all you need are fittings, brass T, some kind of check valve or just a shut off valve like I used and source of pressure/vacuum. Actually, you can use whatever you have: the gauge is suppose to be able show you low pressure precisely enough.


I am going to test my Yamaha Excel engine, so I use taper rubber plug with maximum OD 1.8” – it fits right in rubber intake manifold. I am going to seal the exhaust with rubber sheet.
I am curious to see the result…
Read more...
Friday, October 1, 2010
Busy week
It was busy week for me.
Still working on the Elan's frame. Still need to upload some pictures... Will do!
Wednesday and Thursday I spent at the cottage working on the Yamaha sled and boat trailer. Yamaha is almost done for the winter season. Almost - because I need to pressure test the crankcase. Last season I had problems with lean mixture and I couldn't find any obvious reason for that. I got the low pressure/vacuum gauge, so I am going to test the engine next week.
Another thing I am going to do next week is moving my boat from cottage to city. I got some space on the driveway where I can park it and it's much easier to work near the home - much more productive. I changed the wheel bearings yesterday and installed new trailer lights, so it's safe on the road. The longest trip I made with that trailer was to the nearest marina which is in front of my cottage:) Now I can go as far as I want:) Trailer wheels still need to be cupped, but I am going to do next week. Also, towing vihecle (Toyota Corolla) has to get trailer lights converter because it has separate circut for turn lights. I was thinking about making the convertor myself but ended up buying it for $17 at Princess Auto. Not THAT cheap, but I can live with that:)
Read more...
Still working on the Elan's frame. Still need to upload some pictures... Will do!
Wednesday and Thursday I spent at the cottage working on the Yamaha sled and boat trailer. Yamaha is almost done for the winter season. Almost - because I need to pressure test the crankcase. Last season I had problems with lean mixture and I couldn't find any obvious reason for that. I got the low pressure/vacuum gauge, so I am going to test the engine next week.
Another thing I am going to do next week is moving my boat from cottage to city. I got some space on the driveway where I can park it and it's much easier to work near the home - much more productive. I changed the wheel bearings yesterday and installed new trailer lights, so it's safe on the road. The longest trip I made with that trailer was to the nearest marina which is in front of my cottage:) Now I can go as far as I want:) Trailer wheels still need to be cupped, but I am going to do next week. Also, towing vihecle (Toyota Corolla) has to get trailer lights converter because it has separate circut for turn lights. I was thinking about making the convertor myself but ended up buying it for $17 at Princess Auto. Not THAT cheap, but I can live with that:)
Read more...
Sunday, September 26, 2010
Getting close to finish with the frame!!!
Couple more things done to the frame: I am getting close to the finish here!
So far I finished 1lb spool of 0.25” wire and emptied the bottle of gas:) Working outside requires a bit more gas flow for welding, so I can’t do much about CO2/Argon consumption…
The long edge strips welded in place: footrest getting rigid again!!!


I was thinking about reinforcing the tunnel along the footrests and around axles mounting plates: finally I decided, that two goals could be achieved at once! I just integrated two parts together!
A bit of measuring and playing with templates produced a good result! The angled piece will give an extra support for the tunnel and will spread the load from the mounting plates for axles. Just for an extra strengh I drilled series of holes, so I can weld the reinforsment to the frame not only around the edge but in the middle as well.
Here are the pictures(pictures in daylight would be better, but I just wanted to document the result and didn’t want to wait):


Here is the part welded to the frame:


Read more...
So far I finished 1lb spool of 0.25” wire and emptied the bottle of gas:) Working outside requires a bit more gas flow for welding, so I can’t do much about CO2/Argon consumption…
The long edge strips welded in place: footrest getting rigid again!!!


I was thinking about reinforcing the tunnel along the footrests and around axles mounting plates: finally I decided, that two goals could be achieved at once! I just integrated two parts together!
A bit of measuring and playing with templates produced a good result! The angled piece will give an extra support for the tunnel and will spread the load from the mounting plates for axles. Just for an extra strengh I drilled series of holes, so I can weld the reinforsment to the frame not only around the edge but in the middle as well.
Here are the pictures(pictures in daylight would be better, but I just wanted to document the result and didn’t want to wait):


Here is the part welded to the frame:


Read more...
Thursday, September 23, 2010
More work done on the frame
I don't have much time during the work week, but I manage to continue work on the frame.
The belly is done.
Some small cracks welded.
Some dents fixed.

Cut yesterday new pieces for the sides of the tunnel. Today I will weld them.


Made a template for wheel axles mounting's reinforsment...

Not sure about this design... I might use the same idea Bombardier used on the later frames - just make mounting plates a bit wider like here:

Before I welded the final piece to the belly I protected the steering subframe with some rust paint... Wouldn't hurt:)

That last piece is tacked in...


Read more...
The belly is done.
Some small cracks welded.
Some dents fixed.

Cut yesterday new pieces for the sides of the tunnel. Today I will weld them.


Made a template for wheel axles mounting's reinforsment...
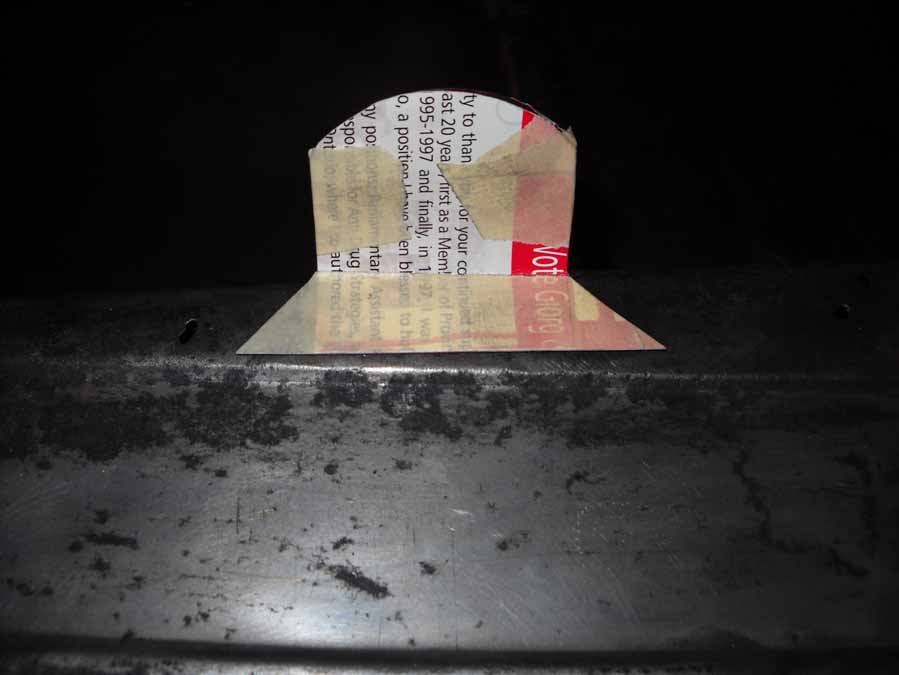
Not sure about this design... I might use the same idea Bombardier used on the later frames - just make mounting plates a bit wider like here:

Before I welded the final piece to the belly I protected the steering subframe with some rust paint... Wouldn't hurt:)

That last piece is tacked in...


Read more...
Monday, September 20, 2010
Nice description for Electrolytic Rust Removal!
Found this today at Conservation Research Laboratory:
Great info!!!
Iron Conservation: Part II - Experimental Variable and Finals Steps
Read more...
Great info!!!
Iron Conservation: Part II - Experimental Variable and Finals Steps
Read more...
Sunday, September 19, 2010
More work done on frame
It was busy weekend: I managed to make a lot! I didn’t spend too much time, though…
Yesterday I fabricated the small piece for the left stringer and welded it in. It’s amazing: it takes just a few second to write about it:)

Here are some more pictures of the stringer piece:


Today I was looking at the belly pan and certainly didn’t like it. Corroded way too much! So, grinder in hands – cut it out! I decided to try fabricating the new belly using the remaining as a guide.

Professional sheet metal work always hypnotizes me, but I never had much luck with it. Takes a lot of effort to learn…
Anyway, with my rubber mallets and a piece of dense foam I managed to shape the new belly pan kind of close to original…


It’s not perfect by any means, but rest of the frame is pretty beat up, so it doesn’t look odd… It took a few minutes to cut it in size and tack weld it to the frame. After that I checked the fuel tank fitment, it went in easily.


After that I welded new piece around. Looks not too bad.


One more small piece to weld in and the front end is done!!!
Read more...
Yesterday I fabricated the small piece for the left stringer and welded it in. It’s amazing: it takes just a few second to write about it:)

Here are some more pictures of the stringer piece:


Today I was looking at the belly pan and certainly didn’t like it. Corroded way too much! So, grinder in hands – cut it out! I decided to try fabricating the new belly using the remaining as a guide.

Professional sheet metal work always hypnotizes me, but I never had much luck with it. Takes a lot of effort to learn…
Anyway, with my rubber mallets and a piece of dense foam I managed to shape the new belly pan kind of close to original…


It’s not perfect by any means, but rest of the frame is pretty beat up, so it doesn’t look odd… It took a few minutes to cut it in size and tack weld it to the frame. After that I checked the fuel tank fitment, it went in easily.


After that I welded new piece around. Looks not too bad.


One more small piece to weld in and the front end is done!!!
Read more...
Subscribe to:
Posts (Atom)
